So what will this app look like on Android? I am picturing a List View with icons on them to remove them from the list and a FAB that allows you to add new tasks. For this tutorial we will use anonymous auth in Firebase to simplify the app, but if you are interested in setting up email auth for your app, check out my tutorial on that here.
If you need to setup React Native on your machine please follow the steps in this tutorial, if you need to set it up for mac you can follow the steps outlined here. If you do not know what React Native, is please read this article.
Please leave comments with any issues, questions or feedback you have.
Setting-up the Project
Navigate to where you want to put your new project and run the following command to create it:react-native init ProjectName
To make sure everything is working correctly, hook up your phone (or start an emulator), go to the root of the project in the command line and run the app:
cd ProjectName
react-native run-android
After your app runs, add Firebase to your project by running
npm install firebase --save
Then, go to your Firebase Console, create a new app and add the Firebase config to your app, if you haven't done this before or don't have a Firebase account, you can follow the steps in the "Set-up Firebase" section of this tutorial.
Make sure your app still runs by refreshing it ( shaking in on a phone or if you are on emulator tapping "r-r" on windows or "cmd-r" in mac).
At this point we will need to enable anonymous auth with our app. In the left panel of the Firebase console for your app click on "Auth". In the auth panel go to the "Sign-in Method" tab and enable the Email/Password option.

We also need to enable the database for anonymous usage. From the left panel click the "Database" option and then go to the "Rules" tab. Here we will change the .read and .write permissions to allow access for any user to use the database by making those options == to null.

Finally, we are going to use a stylesheet for this project. Save styles.js and add it to the root of your project (make sure not to name it styles.js).
Displaying a Static List
Now that we have the ground work for our app we are going to step back and build out a static list of tasks.
In your android.index.js we are going to change the render function to return a ToolbarAndroid and a ListView.
render() {
return (
<View style={styles.container}>
<ToolbarAndroid
style={styles.navbar}
title="Todo List" />
<ListView
enableEmptySections={true}
dataSource={this.state.dataSource}
renderRow={this._renderItem.bind(this)}
style={styles.listView}/>
</View>
);
}
A few things to note:
1. We are using our styles from styles.js here
2. dataSource is a prop for the ListView. Without this the list will not render, the dataSource provides the data that we want to display in the list (like an adapter in android). we will define it in the state shortly.
3. renderRow is a prop for our ListView. This is a function that the ListView uses to display a view for each item in the dataSource.
4. We are setting enableEmptySections to true so we can render an empty list without warnings.
Now that we have our render function in place, we are going to add our constructor which will initialize dataSource.
constructor(props) {
super(props);
const dataSource = new ListView.DataSource({
rowHasChanged: (row1, row2) => row1 !== row2,
});
this.state = {
dataSource: dataSource.cloneWithRows([
{ name: 'Sleep' }, { name: 'Eat' }, { name: 'Code' },
{ name: 'Sleep' }, { name: 'Eat' }, { name: 'Code' },
{ name: 'Sleep' }, { name: 'Eat' }, { name: 'Code' },
{ name: 'Sleep' }, { name: 'Eat' }, { name: 'Code' }])
};
}
We first defined a dataSource with a function to determine when a row should be re-rendered (rowHasChanged). Then we declared the state to be our dataSource with our static tasks added in. The docs on ListView.DataSource can be found here.
We now need to declare our _renderRow() function. This will return a simple ListItem that we will create with the task name in it.
_renderItem(task) {
return (
<ListItem task={task} />
);
}
Create a new folder called, "components" inside of your the root directory of your project the new ListItem will be placed in here. Create a file called ListItem.js inside of components and place the following code in it:
import React, {
Component
} from 'react';
import {
View,
Text
} from 'react-native';
import styles from '../styles.js';
class ListItem extends Component {
render() {
return (
<View style={styles.listItem}>
<Text style={styles.listItemTitle}>{this.props.task.name}</Text>
</View>
);
}
}
module.exports = ListItem;
This returns a View with the title of the list in it along with some styling from our css stylesheet.
Before running/refreshing the app, make sure that you have added the imports for the ListView, Toolbar, ListItem and styles.js to the top of android.index.js:
import React, { Component } from 'react';
import {
AppRegistry,
StyleSheet,
Text,
View,
ListView,
ToolbarAndroid
} from 'react-native';
import * as firebase from 'firebase';
import ListItem from './components/ListItem.js';
import styles from './styles.js'
In your android.index.js we are going to change the render function to return a ToolbarAndroid and a ListView.
render() {
return (
<View style={styles.container}>
<ToolbarAndroid
style={styles.navbar}
title="Todo List" />
<ListView
enableEmptySections={true}
dataSource={this.state.dataSource}
renderRow={this._renderItem.bind(this)}
style={styles.listView}/>
</View>
);
}
A few things to note:
1. We are using our styles from styles.js here
2. dataSource is a prop for the ListView. Without this the list will not render, the dataSource provides the data that we want to display in the list (like an adapter in android). we will define it in the state shortly.
3. renderRow is a prop for our ListView. This is a function that the ListView uses to display a view for each item in the dataSource.
4. We are setting enableEmptySections to true so we can render an empty list without warnings.
Now that we have our render function in place, we are going to add our constructor which will initialize dataSource.
constructor(props) {
super(props);
const dataSource = new ListView.DataSource({
rowHasChanged: (row1, row2) => row1 !== row2,
});
this.state = {
dataSource: dataSource.cloneWithRows([
{ name: 'Sleep' }, { name: 'Eat' }, { name: 'Code' },
{ name: 'Sleep' }, { name: 'Eat' }, { name: 'Code' },
{ name: 'Sleep' }, { name: 'Eat' }, { name: 'Code' },
{ name: 'Sleep' }, { name: 'Eat' }, { name: 'Code' }])
};
}
We first defined a dataSource with a function to determine when a row should be re-rendered (rowHasChanged). Then we declared the state to be our dataSource with our static tasks added in. The docs on ListView.DataSource can be found here.
We now need to declare our _renderRow() function. This will return a simple ListItem that we will create with the task name in it.
_renderItem(task) {
return (
<ListItem task={task} />
);
}
Create a new folder called, "components" inside of your the root directory of your project the new ListItem will be placed in here. Create a file called ListItem.js inside of components and place the following code in it:
import React, {
Component
} from 'react';
import {
View,
Text
} from 'react-native';
import styles from '../styles.js';
class ListItem extends Component {
render() {
return (
<View style={styles.listItem}>
<Text style={styles.listItemTitle}>{this.props.task.name}</Text>
</View>
);
}
}
module.exports = ListItem;
Before running/refreshing the app, make sure that you have added the imports for the ListView, Toolbar, ListItem and styles.js to the top of android.index.js:
import React, { Component } from 'react';
import {
AppRegistry,
StyleSheet,
Text,
View,
ListView,
ToolbarAndroid
} from 'react-native';
import * as firebase from 'firebase';
import ListItem from './components/ListItem.js';
import styles from './styles.js'
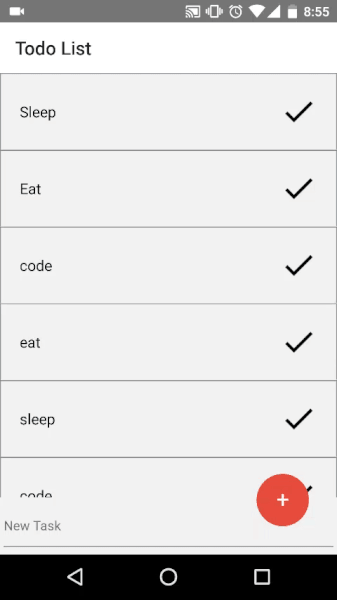
If you want to see the code changes for this section, check out the commit here. When you run the project it should look like this:


Displaying Content from Firebase
With our static list and list item we are in position to create a list populated by Firebase. Our first step is to add a reference to the Firebase database, and remove the static data from the dataSource. Modify your constructor in android.index.js to look like this:
constructor(props) {
super(props);
this.tasksRef = firebaseApp.database().ref();
const dataSource = new ListView.DataSource({
rowHasChanged: (row1, row2) => row1 !== row2,
});
this.state = {
dataSource: dataSource
};
}
To update our list with the tasks from the server we will have to request updates from the tasksRef by giving it a function to run when its value is changed.
listenForTasks(tasksRef) {
tasksRef.on('value', (dataSnapshot) => {
var tasks = [];
dataSnapshot.forEach((child) => {
tasks.push({
name: child.val().title,
_key: child.key
});
});
this.setState({
dataSource: this.state.dataSource.cloneWithRows(tasks)
});
});
}
We call the on() function from tasksRef which tells it to call our arrow function whenever the value of the ref is changed. When this happens we will get a dataSnapshot from the server, we translate the entries in the dataSnapshot into an array of tasks which we use to update our dataSource. we also include a _key in the task entry (which we will use later to delete tasks from our list).
We cannot start listening for updates from the database in the constructor so we will instead add that logic to componentDidMount() (which is only called once in the component's lifecycle).
componentDidMount() {
// start listening for firebase updates
this.listenForTasks(this.tasksRef);
}
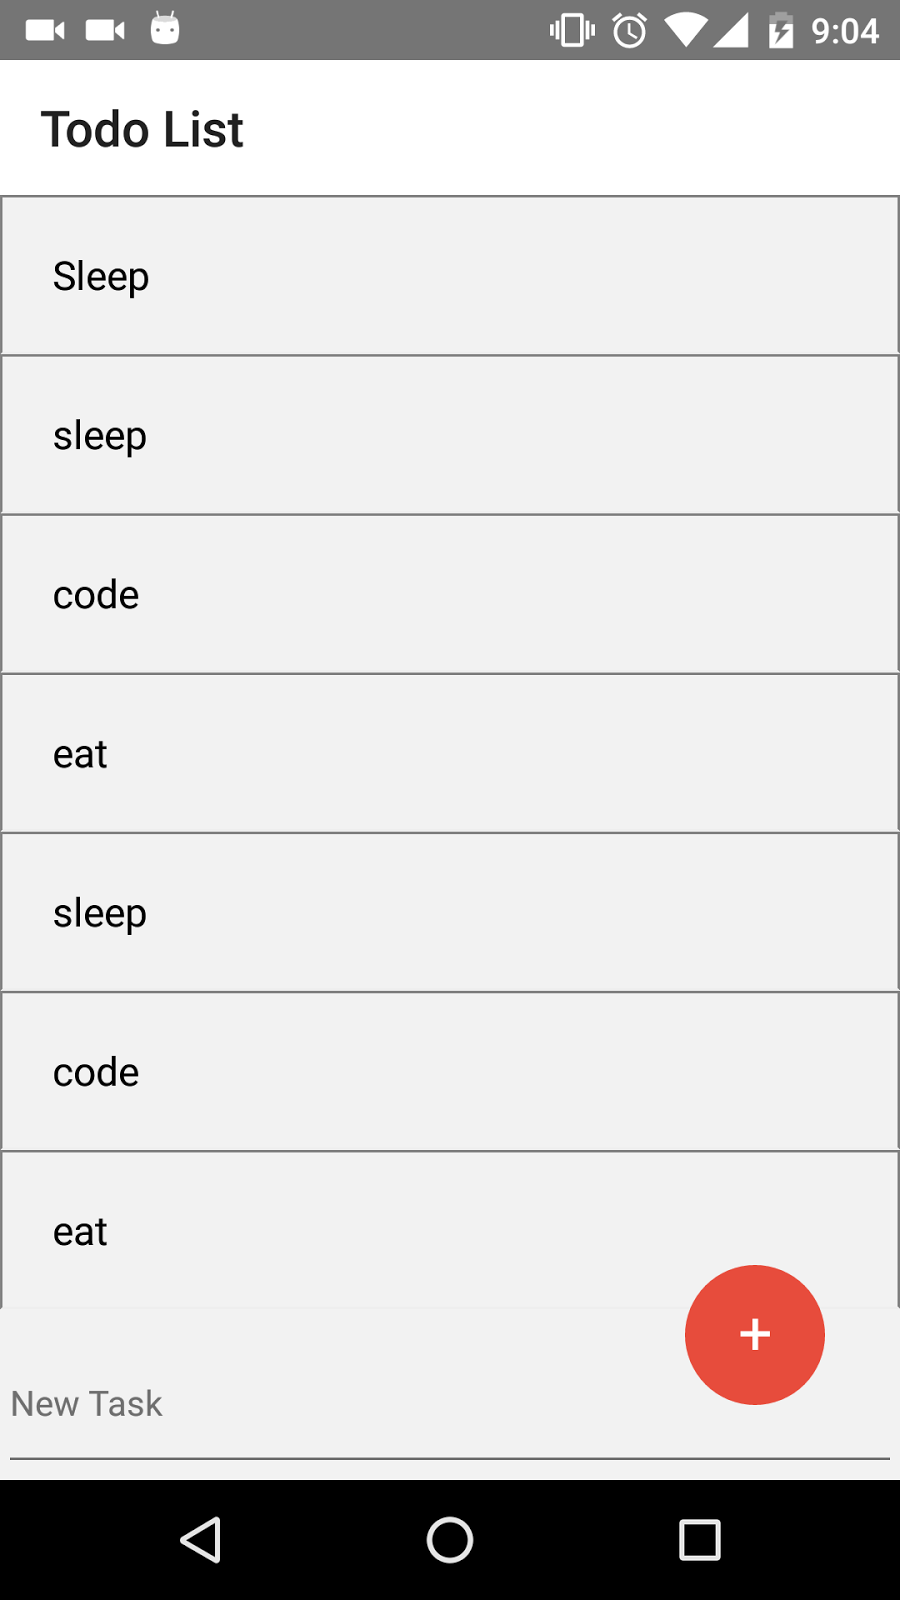
Now, if you refresh your app you should see a nice long list filled with... nothing! That's right, our database has no data. To fix that we will have to make a mechanism for adding new tasks. We will put in a text view to name the new task and a Floating Action Button (FAB) to add it to our database and list.
To create the FAB we are going to use the react-native-action-button library. In the command line, from the root of your project run:
npm install react-native-action-button --save
Then add the following import at the top of android.index.js:
import FloatingActionButton from 'react-native-action-button';
And modify the import statement from react-native to include TextInput:
import {
AppRegistry,
StyleSheet,
Text,
TextInput,
View,
ListView,
ToolbarAndroid
} from 'react-native';
Now we can make use of the FAB and TextInput in the render function of our android.index.js:
render() {
return (
...
<ListView
dataSource={this.state.dataSource}
enableEmptySections={true}
renderRow={this._renderItem.bind(this)}
style={styles.listView}/>
<TextInput
value={this.state.newTask}
style={styles.textEdit}
onChangeText={(text) => this.setState({newTask: text})}
placeholder="New Task"
/>
<FloatingActionButton
hideShadow={true} // this is to avoid a bug in the FAB library.
buttonColor="rgba(231,76,60,1)"
onPress={this._addTask.bind(this)}/>
</View>
);
}
At the bottom of the UI (after the toolbar and list) we have added our text input and FAB. The text input has an onChangeText prop that updates the value of a soon to be created newTask state variable whenever the text input is edited. the TextInput's value is also set to the newTask variable. The FAB sets it's color and defines an onPress prop that will call a soon to be written, _addTask function. So let's get to it! First add a newTask variable to the state in the constructor:
this.state = {
dataSource: dataSource,
newTask: ""
};
Now all we need is the _addTask function:
_addTask() {
if (this.state.newTask === "") {
return;
}
this.tasksRef.push({ name: this.state.newTask});
this.setState({newTask: ""});
}
If the newTask variable is blank we automatically return without doing anything. Otherwise we add the new task to our database (using the tasksRef) and clear our newTask variable (which clears the text input).
Let's view the fruits of our labors! Run/refresh the app and try to add a new item, it should appear in the list and the text input should be cleared. Then try to add blank items, you will see that nothing is added. If you want to see all the code added in this section check out the commit here.
 Deleting Items
So we have our list loaded from Firebase and are able to add our items, the next step is to keep it tidy by removing items we have done. We will add a done icon to each list item. I am using the icon on the right from google's material icon pack.First, we shall modify our ListItem.js to render the done icon as well as a touchable wrapper around the image to handle the user's taps on the item. We will add the import of TouchableWrapper and Image to the top of the file:
import {
View,
Text,
TouchableHighlight,
Image
} from 'react-native';
and place the touchable wrapper and image after the Text view in our render method:
return (
<View style={styles.listItem}>
<Text style={styles.listItemTitle}>{this.props.task.name}</Text>
<TouchableHighlight onPress={this.props.onTaskCompletion}>
<Image style={styles.liAction} source={{uri: 'https://1.bp.blogspot.com/-uRaHoFqqsxY/V70he-ZYRlI/AAAAAAAAA7A/S4Js-D6sMR8vs28NFv7W39rFRAPX7XIWgCLcB/s1600/ic_done_black_24dp.png'}} />
</TouchableHighlight>
{/*Icon taken from google's material icon pack: https://design.google.com/icons/#ic_done*/}
</View>
);
As you can see, the Touchable Wrapper is expecting an onPress prop to be passed into the component, so we will need to add this in our _renderItem function of android.index.js.
_renderItem(task) {
const onTaskCompletion= () => {
(text) => this.tasksRef.child(task._key).remove()}
);
return (
<ListItem task={task} onTaskCompletion={onTaskCompletion} />
);
}
The new function will delete the the task from the database.
To see the code for this section, check out this commit.
Congratulations! You have learned the basics of pulling and pushing data from Firebase and building list views in React Native! Here is the link to the full project.To see the code for this section, check out this commit.
Conclusion
If you are looking for some ways to extend this project, here are some ideas:
- Style list items with a background color generated from the task name.
- Put in an alert when the user taps the done button, asking them to confirm that they want to remove it
- You can make a separate screen for adding tasks and add field's for the due date or an image.
- You can add functionality to edit items.
- You can use Firebase Auth to associate task lists with different users
Please leave comments with any issues, questions or feedback you have!
strict mode does not allow function declarations in a lexically nested statement.
ReplyDeleteerror cant run
Great tutorial, I have one question though, what if I want to create a new list from the same database, should I rewrite the Listen Function ? What is needed to make a call to the firebase db ? Thank you !
ReplyDeleteI can see values on firebase db but not on view
ReplyDeleteThere is something set wrongly during tasks.push inside listenForTasks method:
DeleteChange from child.val().title to name: child.val().name